KOKorean
 ENEnglish
 JP日本語
 CN中文(简体)
 TW中文(繁體)


How to Take Photos for an Online Consultation in Seoul: Scars, Nose, Sagging, Body
Take photos in soft, even daylight without flash, makeup, jewelry or beauty filters, and send the front view, both 45-degree views and both profiles under the same conditions, ideally taken by someone else from about 1.5 m (5 ft) away, since arm's-length selfies can make the nose look larger than it is. For a scar, send one photo that shows where it is and one close-up, plus a side-lit photo if it is depressed. Photos help narrow down the options, but the firmness and depth of a scar or the thickness of cartilage and skin are confirmed at an in-person exam. If you are planning treatment in Seoul, you can send your photos and questions first to see which approach may fit your case.
Curious about your own case? Ask us online →
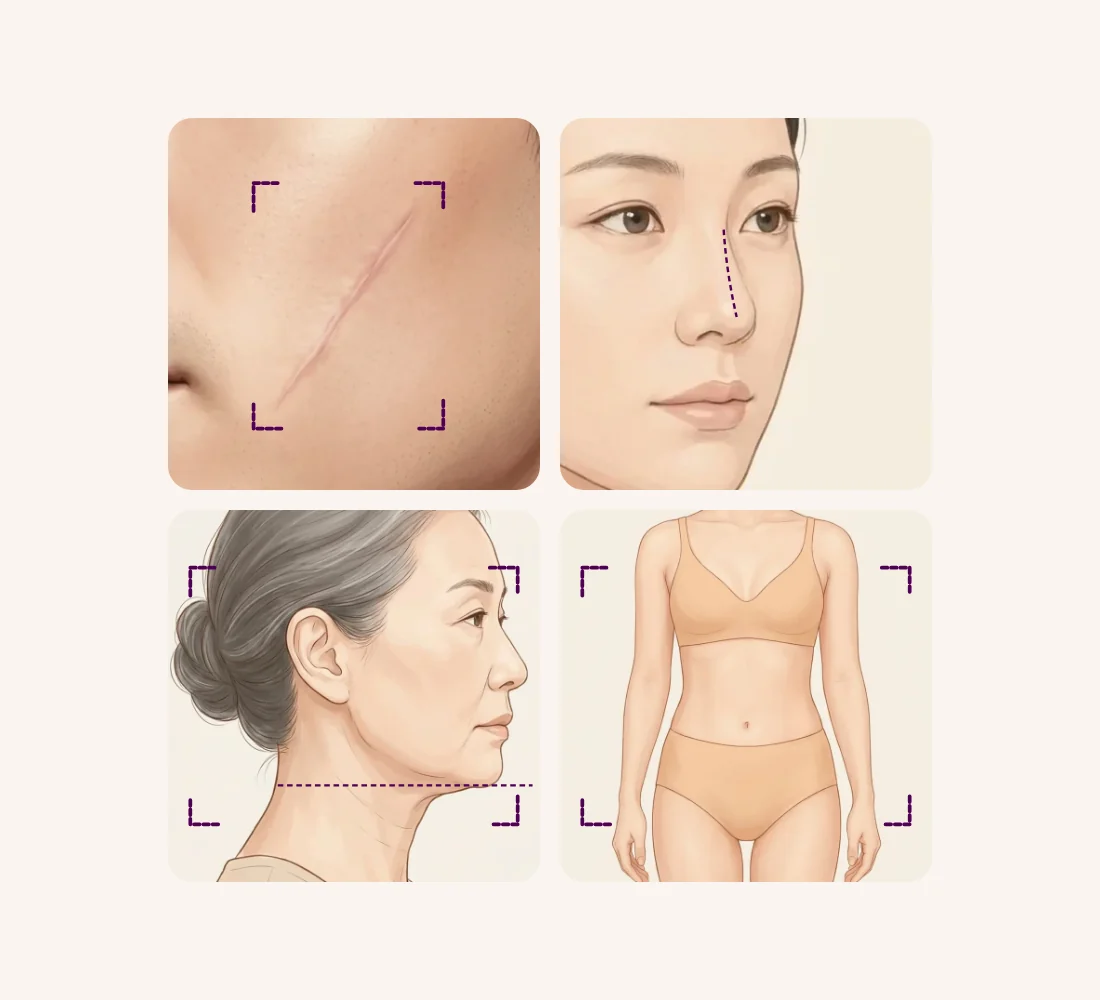
What are the five basics before you take any photo?
When you contact a clinic in Seoul from abroad, the photos you send are usually the first thing the surgeon sees. If the photos do not match how you really look, any advice based on them can miss the mark too. Whether your concern is a scar, your nose, a sagging jawline or your body shape, the same five basics come first.
- Light: take photos in soft, even daylight, for example facing a bright window with no direct sun. Turn the flash off.
- Distance: an arm's-length selfie changes facial proportions more than a photo taken by someone else from about 1.5 m (5 ft) away.
- Angles: one front photo is not enough. Add both 45-degree views and both profiles, taken under the same conditions.
- Bare face: remove makeup, jewelry and glasses, and tie your hair back so your ears and jawline show. Switch off beauty modes, filters and retouching apps.
- Background: stand in front of a plain, light wall, with no other people or personal items in the frame.
These five points adapt the clinical photography standard so you can follow it with a phone at home. The International Skin Imaging Collaboration (ISIC), a global group working on skin imaging, used an expert consensus process to set standards for skin photographs. Its guidelines list lighting, background color, field of view (how much of the body is in the frame), image orientation, focus, resolution, and scale and color calibration as the things to keep consistent.1 A recent review of clinical photography in plastic surgery (a paper that pulls together existing research and practice) points the same way. It advises removing makeup and jewelry, clipping hair back so the whole face and the ears are visible, and using a plain, single-color background.2 The same review recommends a windowless room with set studio lighting, so the light stays the same at any time of day.2 Homes rarely have that kind of setup, so soft daylight from a window out of direct sun takes its place.
What can a photo consultation tell a surgeon, and what can't it?
A photo consultation narrows down the options. Things you can see with your eyes, such as where a scar is, how long it is and what color it is, the line of your nose in profile or the shape of your jawline, show up reasonably well in photos. That lets the surgeon suggest which treatments are worth discussing and what to check when you meet in person.
What photos cannot do is replace an examination with the hands. One study tested exactly this. Five raters scored 18 burn scars in 12 children, both in person and from photographs of the same scars. Agreement between raters was acceptable both in person and from photos: the intraclass correlation coefficient (a 0-to-1 measure of how closely ratings match; closer to 1 means more alike) was 0.71 to 0.87 in person and 0.72 to 0.77 from photos. Yet the scores given in person and the scores given from photos did not agree well enough.3
Put simply, people looking at the same photos tended to agree with each other, but the photo-based rating was not the same as the rating made face to face. It was a small study of children's burn scars only, so it cannot be applied to every scar. Still, it shows clearly why a treatment method and number of sessions are not decided from photos alone. The point of taking good photos is not to skip the examination; it is to make the first conversation match your real situation as closely as possible.
Where should the light come from?
The direction of the light changes more than most people expect, because the ups and downs of skin are seen as shadows. When light comes straight from the camera, the floor and the walls of a dip are lit almost equally, so the contour looks flat. A phone flash is exactly this kind of light. It can also make skin shine, leaving patches that turn white in the photo.
Light from the side behaves differently. One wall of a dip falls into shadow while the wall facing the light gets brighter. That is why scars where height is the problem, such as acne scars or scars that sank after surgery, show up better in side light. On the other hand, deep shadows hide color. If the concern is color, such as a red scar or brown marks, you need a photo in soft, even light.
Light direction and how a scar shows
So for scars, it helps to take two kinds of photo:
- A photo for color: face a bright window during the day, out of direct sun. Mixing fluorescent and warm yellow bulbs changes how skin color looks, so switch off the room lights or use only one type.
- A photo for contour: stand with the window beside you so the light falls across the scar at a low angle. This one matters most for depressed scars.
Skin imaging guidelines list lighting among the conditions to standardize for the same reason.1 If you plan to compare photos over time, take later photos in the same spot, at a similar time of day.
How far away should the phone be?
For the face, and especially the nose, the most common mistake is shooting too close. When the camera is near, the tip of the nose, which is closest to the lens, looks larger, while the cheeks and ears, which are farther away, look smaller. This is called perspective distortion: things near the camera appear bigger, and things farther away appear smaller.
A mathematical modeling study fed average facial measurements into a camera model and calculated how wide the nose looks relative to the face at different distances. Compared with a reference image free of perspective distortion, at about 30 cm (12 inches, a typical arm's-length selfie) the nose looked 30% wider relative to the face in men and 29% wider in women. At about 1.5 m (5 ft), a standard portrait distance, there was essentially no difference.4
A second study measured real selfies and looked at different values. Thirty volunteers took selfies with the front camera of a smartphone at about 30 cm and 45 cm (12 and 18 inches), and had clinical photos taken with a DSLR (an interchangeable-lens camera used by professionals) at about 1.5 m. The nose was on average 6.4% longer in the 30 cm selfies than in the clinical photos, and 4.3% longer in the 45 cm selfies. The width of the nostril base itself barely changed, but its ratio to facial width differed by 10.8% between the 30 cm selfies and the clinical photos, and by 7.8% for the 45 cm selfies.5
The two studies measured different things. The model compared nose width with face width, while the photo study compared nose length and the ratio of the nostril base to face width. So 30% and 6.4% cannot be set side by side to say which effect is bigger. Even so, both point the same way: the closer the camera, the more the nose differs from real life in relation to the face.
How distance changes the nose
This matters most for a nose consultation. If your nose looks large in selfies, part of that may be the camera distance rather than your nose. For consultation photos:
- Ask someone to take the photos from about 1.5 m away, with the phone held at the height of your face.
- If your phone has a telephoto lens (2x or more), use it. A telephoto lens brings the subject closer optically, instead of cropping and enlarging the image.2 If your phone has no telephoto lens, step back rather than moving closer, and crop the photo afterward if needed.
- If you are alone, stand the phone on a shelf or a small tripod at face height and use the self-timer.
The plastic surgery photography review also recommends placing the camera on a tripod, level with the area being photographed, about 1.5 m from the patient.2 The same idea applies to scar close-ups: rather than pressing the lens up against the skin, stay a little farther back and zoom in with the telephoto lens.
Why send 45-degree and profile views, not just a front photo?
A face is three-dimensional, so a lot of it is invisible from a single direction. From the front, a surgeon sees left-right differences and facial width. From 45 degrees, the shape of the cheeks and the nasal tip shows. In profile, the line of the nasal bridge, the angle between nose and lip, the jawline and the neck stand out. For facial concerns, sending the front view, both 45-degree views and both profiles together is much more useful than one photo.
Which angles to take
When you change direction, turn your whole body, not just your head. The plastic surgery photography review also recommends rotating the entire body, not only the head and neck, for oblique and side views.2 Twisting only the head can change how the area under the chin and the neck looks.
The tilt of your head also changes the picture. In one study, three people were photographed from the front and in profile in different head positions, and 20 raters with no prior information compared the photos. Most raters agreed that the jawline looked sharper and there seemed to be less soft tissue under the chin when the neck was extended or the head pushed forward. The authors concluded that small changes in position can change appearance dramatically, so positions before and after surgery must be standardized.6
In everyday terms, a photo with the chin slightly raised can make the jawline look better than it is, and a photo with the head lowered can make the area under the chin look fuller. Keep your chin level with the floor and look straight ahead. Close your lips gently and relax your face.
What extra photos help for each area?
On top of the five basics, each area benefits from a few extra photos.
Extra photos for each area
1For a scar
A photo that shows where it is, a close-up, and a side-lit photo if it is depressed
Scars
2For the nose
Front, 45-degree and profile views, plus a view from below and a smiling profile
Rhinoplasty
3For a sagging jawline, cheeks or neck
Tie your hair back so the area in front of the ears and the neck show, and keep the chin level
Facelift
4For the body
Stand for front, side and back views, and keep your face out of the frame
Body contouring
Scars
- One photo showing location: take a slightly wider shot so it is clear where on the body the scar is.
- One close-up: let the scar fill most of the frame, and check that it is in focus. The skin imaging guidelines treat regional photos and close-ups as separate image types.1
- Something to show size: placing a ruler or tape measure beside the scar makes its length easy to judge. The guidelines include a scale among the standard conditions.1
- Two kinds of light: one photo in soft, even light for color, and one side-lit photo for contour.
- If it pulls when you move: if the scar tightens when you smile, open your mouth or raise your arm, add a photo of that expression or movement.
Scars are judged differently by type. For a raised scar, our guide on telling keloids from hypertrophic scars is also worth reading.
Nose
- Five views: front, both 45-degree views and both profiles, at the same distance and in the same light.
- A view from below: tilt your chin up a little and photograph from below so the nostrils, columella (the strip between the nostrils) and nostril rims show. The plastic surgery photography review lists this "worm's-eye" view separately for the nose.2
- A smiling profile: to see whether the tip drops when you smile, add a profile while smiling broadly. Our guide to drooping nose tip correction explains why.
- For revision surgery: if you have photos from before your earlier operation, please send them too.
Facial sagging (jawline, cheeks and neck)
- Five views: front, both 45-degree views and both profiles.
- Hair tied back: make sure the areas in front of and behind the ears, the jawline and the neck are not covered by hair.
- Chin level: a raised chin can make the jawline look better than it is, so keep it level with the floor.6
- One expression: if smile lines or the corners of your mouth concern you, add a front photo while smiling.
Body
- Standing views: stand straight with your feet together and take front, both side and back views. Front, back and both sides make up the basic set of body views.2
- Arm position: hold your arms slightly away from your body so the waistline is not hidden.
- Leave your face out: keep the face out of body photos, framing only what is needed, for example from the neck to the thighs.2
- Clothing: wear plain, simple underwear, and wear the same kind again for later comparison photos.2
- For uneven contours: if the problem is height, such as unevenness after liposuction, add a side-lit photo.
At a glance:
| Area | Basic photos | Helpful extras | Watch out for |
|---|---|---|---|
| Scar | Location shot + close-up | Side-lit photo, pulling expression or movement | Ruler beside the scar, focus on the scar |
| Nose | Front, both 45°, both profiles | View from below, smiling profile | Avoid arm's-length selfies |
| Facial sagging | Front, both 45°, both profiles | Smiling front view, profile showing the neck | Hair tied back, chin level |
| Body | Standing front, both sides, back | Close-up of the area of concern, side-lit photo | Face out of frame, same underwear |
What can photos show, and what needs an in-person exam?
Even well-taken photos miss some things. A photo records the surface; an examination uses touch and movement to find out what is underneath.
Photos can show
- Scar location, length, color and shape
- Nose profile, tip direction, asymmetry
- How the jawline, cheeks and neck sag
- Body contour and left-right differences
- Changes with expression or posture (if photographed)
Needs an in-person exam
- Scar firmness, thickness and depth
- Whether the scar base is tethered below
- Cartilage strength, tip skin thickness
- Septum inside the nose and breathing
- Skin laxity and fat felt by pinching
- Tissue condition at earlier surgery sites
For example, two depressed scars can look alike in photos even though one is pulled in because its base is stuck to deeper tissue, while the other has sunk because tissue is missing. The nose is similar: a photo shows the line of the bridge, but the bone and cartilage that form that line, and the thickness of the skin over them, are only known by touch and by looking inside the nose. With facial sagging, how much skin has loosened and how much fat there is are checked by gently pinching and lifting the tissue.
As the scar-rating study above showed, assessments from photos and in person may not agree well enough.3 So it makes sense to treat what you hear after a photo consultation as "likely directions", with the final plan set after an in-person exam in Seoul.
Before you send anything, check that you have the five basic views in good light, the extra photos for your area, and a few lines about your history. You can send us a message with your photos and questions before planning your trip.
What should you write alongside the photos?
If the photos show where you are now, the message you send with them explains how you got here. Each of Bonita Clinic's treatment pages lists what is helpful to tell us before a consultation.
Adding the following makes the consultation more accurate:
- Medicines you take regularly and any medical conditions
- Older photos that show change over time, such as photos from before surgery or soon after a scar formed
- The clinic or country where earlier surgery was done and the approximate date (if you have no records, what you remember is enough)
- The one thing you most want to change, and what you would like to keep as it is
People often do not know what filler or material was injected. Our foreign-material removal page notes that you can consult even if you do not know what it was.
How do you protect your privacy when sending photos?
Photos of your face and body are highly personal. A plastic surgery review written around US patient-privacy rules treats clinical photos in which a person can be recognized as protected health information, and says that using them outside clinical care, such as for teaching or publication, needs separate written consent.2 On your side, a few habits let you share only what is needed:
- Only the area needed: for a scar consultation, photograph the scar and enough around it to show where it is. For the nose or facial sagging, the whole face is needed, because proportions and asymmetry are judged across the face.
- No face in body photos: the review also recommends keeping the face out of body photographs.2
- Nothing unnecessary: do not send passports, ID cards, card numbers or other details unrelated to the consultation. If you share previous surgical records, cover personal numbers.
- Check the background: make sure no mail with your address, family members' faces or people reflected in mirrors appear in the frame.
- File names: do not put your full name or date of birth in photo file names. The review gives this rule to clinics, and it is just as useful for the person sending the photos.2
If you want to know how your photos will be used or stored, feel free to ask when you contact us.
How we approach it at Bonita Clinic
Treatment options you can discuss in Seoul
Bonita Clinic is on the 3rd floor of 565 Gangnam-daero, Seocho-gu, Seoul, about 100 m on foot from Exit 8 of Nonhyeon Station (Line 7). Dr. Kwang-Seop Jung, the director, is a board-certified plastic surgeon (Brazil) and has seen patients at the same location since the clinic opened in 1995. The topics in this guide connect to the following areas on our treatment pages:
- Scars after cosmetic surgery: scars after rhinoplasty (such as alar reduction marks or scars after silicone removal), after a face lift (pixie ear, incision marks) or after breast surgery, and depressed scars after implant or filler removal. Surgical restoration comes first where needed, followed by combined lasers to refine color and texture if needed.
- Nose surgery and revision: hump, crooked, tip and drooping-tip surgery, alar reduction and nasal bone narrowing, as well as implant, tip and contracted-nose revision and implant removal.
- Facelift: endoscopic lifting of the SMAS (the thin layer of tissue under the facial skin that covers the muscles), with the neck addressed through an incision behind the ear when needed. Jaw liposuction, fat grafting with adipose stem cells or dissolving threads are added only when the case calls for them.
Which of these fit you is decided after an examination; photos help decide what to examine first.
Why do the plan and cost differ from person to person?
Two people who send similar-looking photos can need very different plans. Photos show the surface, while the plan and cost depend on what is found underneath and how much needs to be done.
- Area and how many concerns are treated
- Method: surgery, laser or a combination
- Anesthesia: local, sedation or general
- Number of sessions or stages
- First treatment or revision of earlier surgery
- What the in-person exam finds beneath the surface
Final plan and quote after an in-person exam
That is why a final estimate is given only after an in-person examination, once the method and the extent of treatment are clear. Photos can narrow down the direction, but not the extent.
Sending photos from abroad: planning your visit and photos at home
A photo consultation before you travel helps you decide which questions to bring and which treatments to discuss, but the plan itself is confirmed at your first in-person visit in Seoul. How long you should stay, when stitches come out and how many follow-up visits you need all depend on the type and extent of treatment, so they are planned with you at consultation rather than promised in advance. Our guide on planning a visit to Seoul for scar treatment walks through that flow in more detail.
The photo habits in this guide remain useful after you go home. Taking dated photos in the same spot, in the same light, from the same distance and angles makes it much easier for any doctor to compare your progress, as the study on head position showed for before-and-after photos.6 Keep them in a separate album so you can find them quickly. If pain, redness, swelling or bleeding gets worse instead of settling after treatment, see a doctor near you promptly rather than waiting to send photos.
Photos taken from the same angle: real treatment cases
These cases appear on Bonita Clinic's scar treatment page. The before and after photos were taken from the same direction and a similar distance, so the same spot can be compared side by side. Taking your own consultation photos this way makes later changes just as easy to compare. Results vary from person to person.
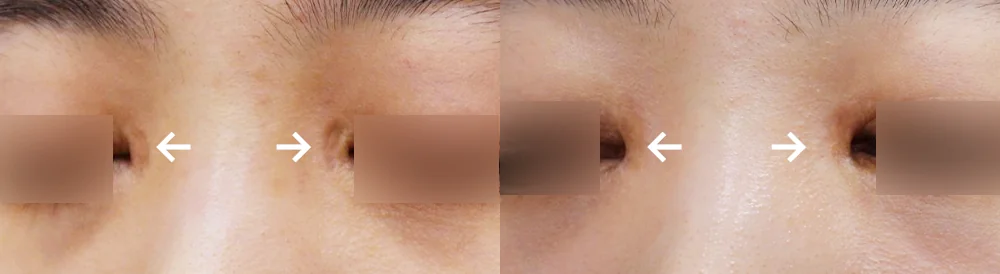
Scars at the inner corners of both eyes, photographed from the front (arrows)
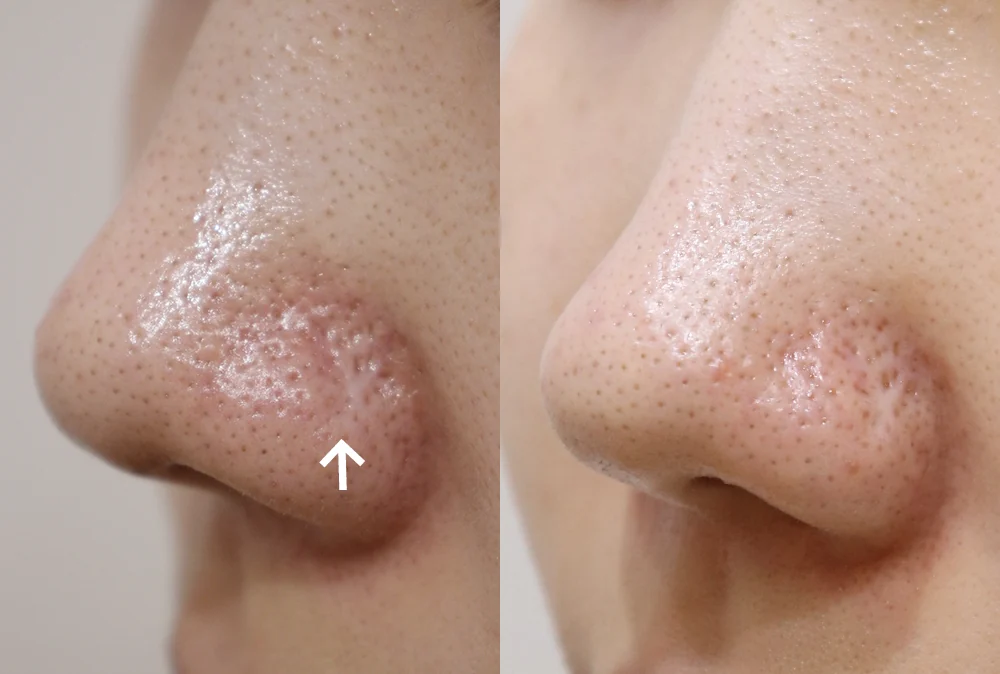
Small depressions on the nostril wing, photographed from the side at an angle (arrow)
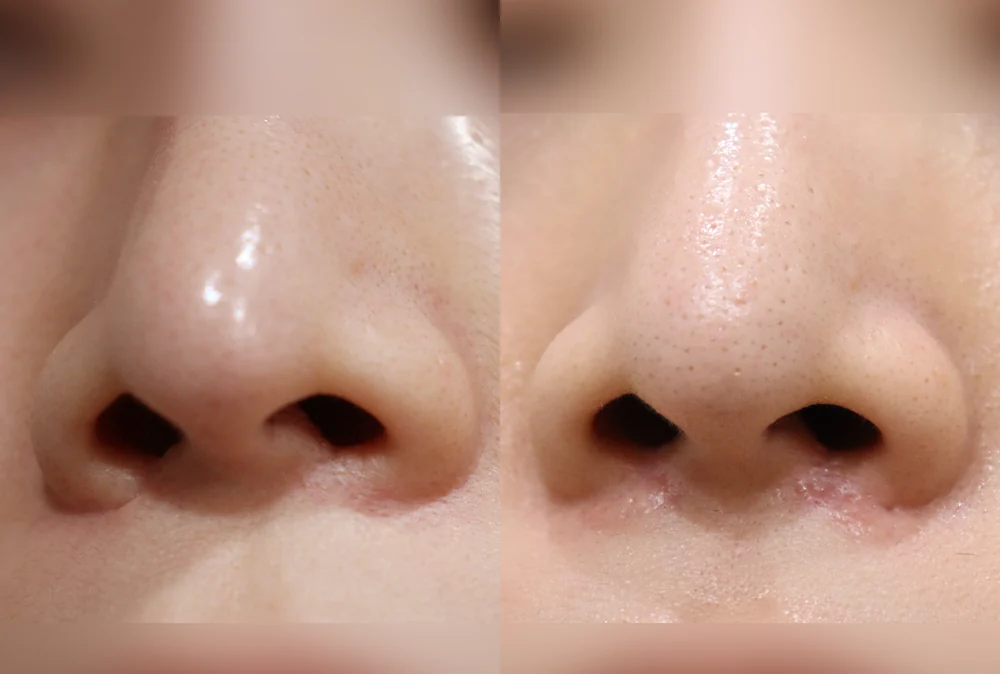
The nose photographed slightly from below so the nostril rims show
* Results vary from person to person. Side effects are possible, so please decide after a thorough consultation with a doctor.
Frequently asked questions
Can I just send selfies?
You can, and a consultation is still possible. But an arm's-length selfie can make the nose look longer and larger than it is.45 For the nose or facial contours, a photo taken by someone else from about 1.5 m, or with the phone on a stand and the self-timer, is more accurate. Selfies are fine for scar close-ups, as long as the scar is in focus and the light is good.
Should I wear makeup or use a beauty filter?
It is better not to. Makeup hides the color and edges of a scar, and retouching apps and beauty modes can smooth skin or reshape facial contours. Clinical photography standards likewise call for removing makeup and jewelry first.2 Check that the beauty setting in your phone's default camera is switched off.
Can a surgeon decide the treatment and number of sessions from photos alone?
Photos can narrow down the direction, but cannot settle it. The firmness and depth of a scar, the thickness of cartilage and skin, and how much the skin has loosened are only known by touch and movement. In a study comparing scar ratings made from photos and in person, the two did not agree well enough.3 That is why the method, the number of sessions and the recovery schedule are explained after an in-person exam.
Do older photos help?
Yes. Photos from before surgery, from soon after a scar formed or from around an earlier treatment show how things have changed. Please note the date each photo was taken. Differences show up properly only when photos taken from the same direction and in the same posture are compared, because even small changes in posture can change appearance considerably.6
I'm not comfortable sending photos that show my face. What can I do?
For a scar or body consultation, it is enough to send the area and enough around it to show where it is. Body photos should leave the face out from the start.2 For the nose or facial sagging, though, proportions and asymmetry are judged across the whole face, so photos showing the face are needed. If you are hesitant, you can describe your concern in writing first and agree on which photos to send as the conversation goes on.
What to prepare before your consultation
- Photos that follow the five basics (light, distance, angles, bare face, background)
- The extra photos for your area (scar close-up and side-lit photo, nose from below, level profile for sagging, body front, sides and back)
- The cause of a scar and when it formed, and the type and approximate date of any earlier treatment or surgery
- Medicines you take and any medical conditions
- What you would like to change, and what you would like to keep
You can read more on our cosmetic surgery scars page, rhinoplasty page and facelift page. For timing, see when to start treating a surgical scar; for nose scars, see when laser helps and when excision is needed; and for types of sagging, see our facelift guide.
References (6)
Sources that support the explanations in this article. Study findings describe general trends and do not guarantee individual results.
- Finnane A, Curiel-Lewandrowski C, Wimberley G, et al. Proposed Technical Guidelines for the Acquisition of Clinical Images of Skin-Related Conditions. JAMA Dermatol. 2017;153(5):453-457.doi:10.1001/jamadermatol.2016.6214Consensus-based guidelines (abstract) from the International Skin Imaging Collaboration: lighting, background color, field of view, orientation, focus and depth of field, resolution, and scale and color calibration are standardized, with separate guidance for regional and close-up images
- Thornton SM, Attaluri PK, Wirth PJ, et al. Picture Perfect: Standardizing and Safekeeping Clinical Photography in Plastic Surgery. Aesthet Surg J Open Forum. 2024;6:ojae012.doi:10.1093/asjof/ojae012Review of plastic surgery photography (full text): remove makeup and jewelry, clip hair back, plain background, camera on a tripod level with the area at about 1.5 m, turn the whole body for oblique and lateral views, worm's-eye view for the nose, front/back/side body views without the face and consistent underwear, telephoto lenses, identifiable photos as protected health information under US rules with separate written consent for non-clinical use, no names in file names
- Simons M, Ziviani J, Thorley M, et al. Exploring reliability of scar rating scales using photographs of burns from children aged up to 15 years. J Burn Care Res. 2013;34(4):427-438.doi:10.1097/BCR.0b013e3182700054Reliability study (abstract): five raters scored 18 burn scars in 12 children in person and from photos; inter-rater reliability was acceptable both ways (0.71-0.87 and 0.72-0.77), but agreement between in-person and photo ratings fell below acceptable levels (few severe scars included)
- Ward B, Ward M, Fried O, Paskhover B. Nasal Distortion in Short-Distance Photographs: The Selfie Effect. JAMA Facial Plast Surg. 2018;20(4):333-335.doi:10.1001/jamafacial.2018.0009Mathematical model (full text): at about 30 cm (12 in) the nose looks 30% (men) and 29% (women) wider relative to the face than in a distortion-free reference, and at about 1.5 m (5 ft) there is essentially no difference
- Pressler MP, Kislevitz ML, Davis JJ, Amirlak B. Size and Perception of Facial Features with Selfie Photographs, and Their Implication in Rhinoplasty and Facial Plastic Surgery. Plast Reconstr Surg. 2022;149(4):859-867.doi:10.1097/PRS.0000000000008961Cross-sectional comparison of 30 volunteers (abstract): nasal length was 6.4% longer in 12-inch and 4.3% longer in 18-inch front-camera selfies than in 5-foot DSLR clinical photos; alar base width did not change significantly, while the alar base-to-facial width ratio differed by 10.8% (12-inch) and 7.8% (18-inch)
- Sommer DD, Mendelsohn M. Pitfalls of nonstandardized photography in facial plastic surgery patients. Plast Reconstr Surg. 2004;114(1):10-14.doi:10.1097/01.prs.0000127791.31526.e2Photo-rating study (abstract): 20 raters compared three people photographed in different head and neck positions; most agreed the jawline looked sharper with less submental tissue when the neck was extended or the head pushed forward, so positioning must be standardized
About this article
This article separates general medical information from Bonita Clinic's own approach. Because the right decision depends on each person's condition, it is not a substitute for a consultation.